Monday, April 2, 2018

Best Online MTS to M4V/MOV Converter Alternative

MTS is a file format which is used to run high definition videos. MTS is often saved in AVCHD (Advanced Video Coding High Definition) created by Panasonic and Sony High Definition Camcorders. Both 720p as well as 1080i are supported by this file extension. To play or edit MTS files, you need more powerful software to handle it cause that normal video players can't support MTS files. Many popular NLE software can't accept MTS files, neither. Fortunately, there are many online MTS video converters on the internet that can help you convert MTS files to other popular video and audio formats. For example, if you want to play or edit MTS video on your Mac, converting MTS to M4V/MOV will be a good choice, M4V/MOV are developed by Apple which can be play and edit smoothly on you iDevice.

mts files

Convertfiles.com is an online based platform that can be used to make file converts from MTS to M4V/MOV with the greatest ease and convenience. Follow a simple three step process and you are good to go. First upload the MTS file, select M4V as the target file that you need and finally click on convert file. The process will run quick before a download link pops up for you to make your download or end it to your email. The quality of your data is retained through the conversion process. 

However, this MTS to M4V/MOV converter has many limitations which brings us lots of inconvenience, for instance, you have to leave your private info to this website. Apart from Online MTS converter, there are also many desktop MTS to M4V/MOV converter software that can enable you to re-encode MTS files. Among the many Online MTS converter alternatives, Pavtube iMedia Converter for Mac | for Mac is the best one. It is  is specially designed for Sony, Canon, JVC and Panasonic AVCHD Camcorder/camera owners to convert recorded AVCHD MTS videos to various video formats for easily editing in editing software, like Final Cut Pro, iMovie, Adobe Premiere, Sony Vegas, Cyberlink PowerDirector, Avid, Magix Movie Edit Pro, Windows Movie Maker and so on. This program help users to convert camcorder recorded MTS/M2TS footages to playable video formats for Apple TV, iPad, iPhone, iPod, MacBook, Samsung Galaxy Tab, Samsung Galaxy S, Amazon Fire TV, Xbox One S, PS4 Pro, Roku, Android phone, etc. 

Key Features
* Fully Support interlaced and progressive AVCHD 3840*2160, 1920*1080, 1440*1080, 1280*720 videos shot with Sony, Panasonic, Canon, JVC, etc. 
* Freely customize output video/audio settings, including Codec, Size(Resolution), Bitrate, Frame Rate to export your desired video 
* Convert AVCHD (.mts/m2ts) footages to editable video formats, like DVCPRO HD (*.mov), HDV (*.mov), Avid DNxHD(*.mov), QuickTime(*.mov) for easily editing in FCP, AVID and playback on iDevice.  
* Provide optimised presets for Apple devices and Android Tablets/phones. 
* Simply merge multiple MTS footages into big one just with one click 
* Accurate trim and crop MTS (*.m2ts or *.mts) videos 
* Split the selected video file into required video clips by specifying clip quantity, duration time and file size. 
* Add text, image, and video watermark to protect self-made clips 
* Replace original audio to make your desired video story 
* "Darg-and-Drop" and "Batch Conversion" features are supported.
*More than a MTS to MOV converter(review).

Quick Guide: Convert MTS Files Using Online MTS Converter Alternative

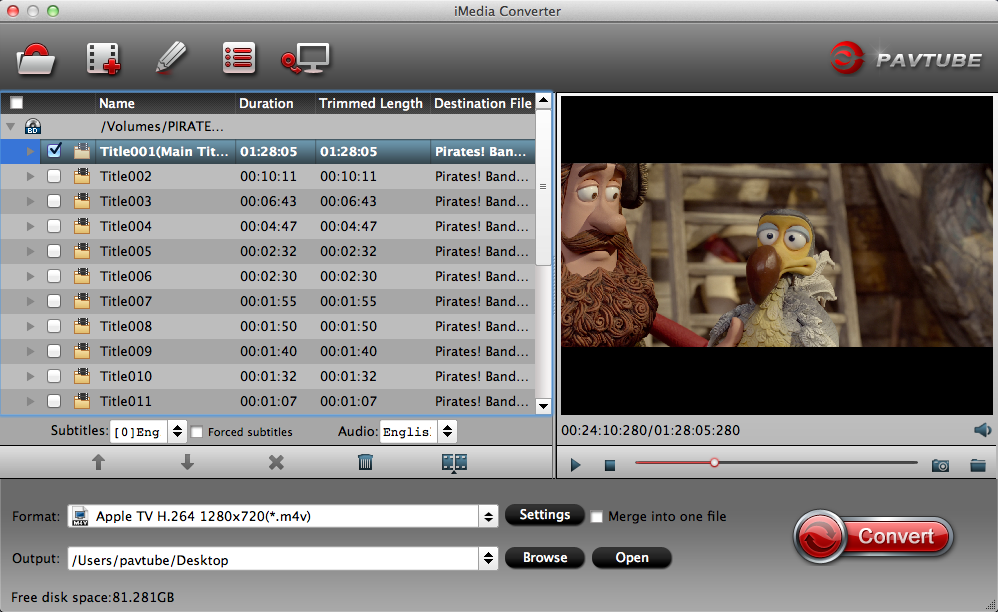
Step 1: Import MTS/M2TS videos on Mac

Click "Add File" button to open the file browser window and navigate to the MTS/ M2TS files you would like to convert. Or drag-and-drop files stored on your computer to the interface of this MTS converter. It supports batch conversion, which allows you to import and convert multiple video files at a time.

mac

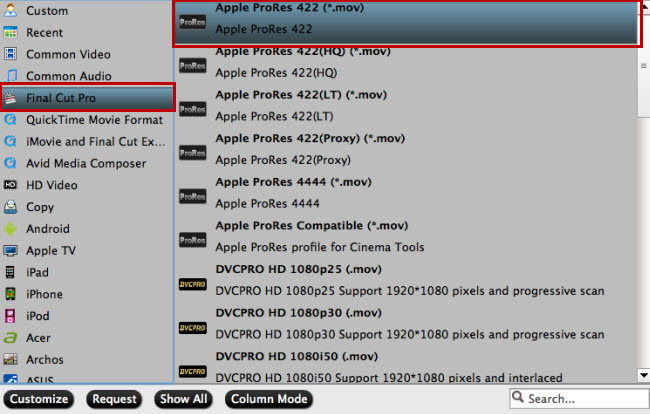
Step 2: Choose MOV/M4V as output format

From its drop-down format list, navigate to "HD Video", you will see dozens of video formats in its submenu.

Output high definition HD MOV file format

Output format for HD TV

Output QuickTime MOV file format or M4V-MPEG -4(*.M4V)

Image result for site:multipelife.com quicktime mov

Output Apple InterMediate Codec(AIC)(*.mov) for iMovie

Image result for site:multipelife.com quicktime IMOVIE MOV

Output Apple Prores 422(*.mov) for Final Cut Pro

Image result for site:multipelife.com quicktime IMOVIE MOV

Edit MTS Files Before Conversion

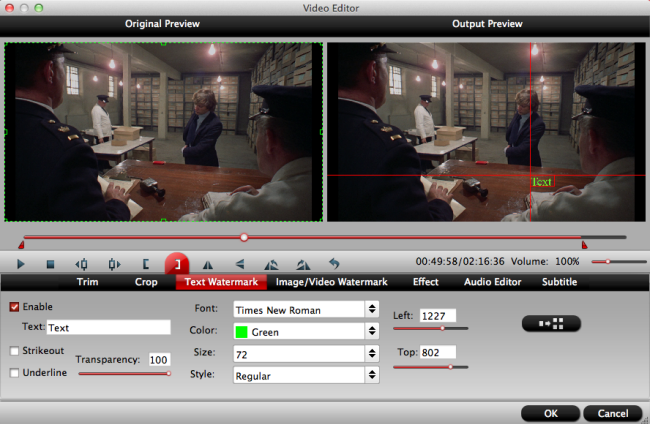
If there is a need, you can edit your MTS video files by clicking the "Edit" image button. You can trim, crop, add effect, watermark and subtitle to your videos.

TrimDrag the two sliders to select the segment you want, and then click scissor icon and OK button. In this way, you can cut off any clip you don't want.
Crop: Drag and drop a dotted rectangular box to choose any screen area of the video. Immediately, the selected video area will be enlarged in the preview window.
EffectOffer you a lot of cool effects that you can apply to the video.
Watermark: Add image or text watermarks to personalize your video.
SubtitleAdding subtitle files is available in this program.

EDIT MTS

Step 3: Convert MTS while keeping HD-quality 

After all the settings, now, just click the "Convert" button to start converting .mts to .mov, .m4v file. After the conversion, you can locate the generated files in the output folder.

Now, you can play your AVCHD MTS files on VLC, KMPlayer, iPhone, iPad or edit your MTS files in Final Cut Pro, Premiere Pro, Sony Vegas Pro, etc.

Monday, March 26, 2018

Can't Edit DJI Mavic Air 4K with After Effects? Fixed!

DJI has announced Mavic Air for many days, many DJI lovers are hesitating to buy this drone or not. The new $799 Mavic Air shares a lot of similarities with both the DJI Spark and the Mavic Pro and Pro Platinum. Like those models, it’s a compact drone with a 12-megapixel camera and a handful of different flying and shooting modes. The Air also has a couple of new tricks, like new obstacle avoidance technology. The another attractive trick is the Air shoots 4K video at 30 fps with a 100Mbps bitrate, compared to Pro's 4K footage at 60Mbps.

On the one hand you can enjoy the super clear picture of the 4k video, on the other hand you may be painful when you try to edit the 4k footage with Adobe Affter Effects. Below is a question a friend asking for help in a forum, let's go check what's he saying.

Why does your DJI Mavic Air 4K video look horrible in After Effects?

"Hello, I just purchased a DJI Mavic Air camera, when I import the 4k video into After Effects, it looks blurry and pixely. However, when I view the same video out of the folder that it resides in, the video looks amazing. What am I doing wrong? I'm assuming I'm doing something wrong during the import process. Any suggestions? Thank you!"

The DJI Mavic Air shoots 4K video in MP4 or MOV (H.264/MPEG-4 AVC), which is acturally included in Adobe After Effects supported video formats list, so the reasons that you fail to edit DJI Mavic Air 4k footage are in two version: the video format is not the best native editing codec for After Effects, the other one is the 4k footage compressed with MPEG-4 AVC/H.264 still have big file size, and it takes a lot of time for After Effects to render those 4k footages.

To ensure a smooth workflow of DJI Mavic Air 4K video with After Effects, it is ideal for you to transcode DJI Mavic Air 4K video to After Effects editing codec - HEVC (aka H.265) codec footage in a QuickTime(.MOV) container, which is a video compression standard designed to substantially improve coding efficiency when compared to its precedent, the Advanced Video Coding (AVC), or H.264. HEVC promises a 50% storage reduction as its algorithm uses efficient coding by encoding video at the lowest possible bit rate while maintaining a high image quality level.

You can performing DJI Mavic Air 4k video to After Effects transcoding process on Windows with Pavtube Video Converter Ultimate | for Mac, it allows you to output 4K MOV, 4K MP4, 4K MKV, 4K XAVC even any 4K video formats to QuickTime(*.mov), H.264 MP4, H.264 M4V, MPEG-1, MPEG-2, MPEG-4 for After Effects. Moreover, this software take full advantage of the NVIDIA CUDA technology and AMD® Accelerated Parallel Processing (APP) to largely accelerate video encoding speed. The GPU acceleration saves users time when encoding Blu-ray/DVD disc or digital video files to H.264 codec or H.265 codec.

Related topics: Best DJI Video Converter You Need Have One | Best Editing Workflow of DJI Osmo 4K Video with iMovie/FCE on Mac

How to import and edit DJI Mavic Air 4K video with After Effects?

Step 1: Transfer DJI Mavic Air 4K recorded footage to your computer.

The DJI Mavic Air records footage on an SD card, you can remove the SD card from the camera, insert the SD card to a card reader, then plug in the card reader into your computer SD card Port for transferring the video footage to your local hard drive.

Step 2: Import DJI Mavic Air Professional 4K videos.

From "File"drop-down option, select "add Video/Audio"to add source DJI Mavic Air 4K video files to the program.

load 4k

Step 3: Select output file format.

Click "Format"bar, from its drop-down list, select "Common Video"> "MOV - QuickTime(*.mov)"as your desired output file format. H.264/H.265 MP4, H.264 MOV, H.264 M4V, MPEG-1, MPEG-2, MPEG-4 almost all After Effects supported video formats could be find in its formats list, go check by yoursevles.

Image result for site:multipelife.com ultimate h.264 mov quicktime

Tips: After you have defined the output format, then cilck the Settings on the UI, in the pop-up window, you are able to adjust video/audio codec, resolution, bit rate, frame rate, channels, etc. To compress DJI Mavic Air 4k to 1080p by changing resolution from 3080*2160 to 1920*1080. To get smaller video file by lowering the video bit rate.

Tips: Enable GPU Encode Acceleration

When you want to enjoy the acceleration, you need to do some settings: Click "Tools" > "Options", in the opened "Options" window, click "Acceleration" menu, then check "Enable GPU Encode Acceleration" option so that the program will accelerate conversion speed when you are encoding DJI Mavic Air 4K to H.265/H.264 codec.

NOTE: You need to make sure your PC configuration supports the GPU acceleration, you can refre to this: Nvidia Cuda Speed Up.

Enable GPU Encode Acceleration

Step 4. Start the conversion

Start the DJI Mavic Air 4k to QuickTime MOV conversion by pressing the red button Convert on the UI, wait for a while, go click "Open the Output Folder" to get the generated file. Now you are free to input the covnerted DJI Mavic Air 4k with After Effects for postproduction without any obstacles.

Video and animation file formats - After Effects

Format
Import/Export support
Format Details
MXF/ARRIRAW
Import only
ARRIRAW codec in an MXF container file
H.265 (HEVC)
Import only
HEVC (also known as H.265) codec footage in a QuickTime (.MOV) container
3GPP (3GP, 3G2, AMC)
Import and Export
 
Adobe Flash Player (SWF)
Import only
Note: SWF files are imported with an alpha channel. Interactive content is not retained. Export functionality of SWF files is supported by versions earlier than After Effects CC 2014.
Adobe Flash Video (FLV, F4V)
Import only
 
Animated GIF (GIF)
Import and export
 
AVCHD (M2TS)
Import only
 
DV
Import and Export
In MOV or AVI container, or as container-less DV stream; requires QuickTime on Windows
H.264 (M4V)
Import only
 
Media eXchange Format (MXF)
Import only
 
MPEG-1 (MPG, MPE, MPA, MPV, MOD)
Import only
 
MPEG-2 (MPG, M2P, M2V, M2P, M2A, M2T)
Import only
Some MPEG data formats are stored in container formats with filename extensions that are not recognized by After Effects; examples include .vob and .mod. In some cases, you can import these files into After Effects after changing the filename extension to one of the recognized filename extensions. Because of variations in implementation in these container formats, compatibility is not guaranteed.
MPEG-4 (MP4, M4V)
Import only
 
Open Media Framework (OMF)
Import and Export
Raw media [or essence] only; Windows only
QuickTime (MOV)
Import and Export
 
Video for Windows (AVI)
Import and Export
Export is on Windows only.
Windows Media (WMV, WMA)
Import only
Windows only
XDCAM HD and XDCAM EX (MXF, MP4)
Import only
 

Monday, March 19, 2018

Compress DJI Mavic Air 4K to 1080p for Editing in iMovie

4K is an up-and-coming video technology that promises a better quality picture when you're watching movies or TV shows. You can get video with 4k resolution from many where, including downloaded from Youtube, shot with UHD camcoders (Panasonic, Sony, DJI, GoPro etc), digitalize 4K Blu-ray movies. However, no matter where your 4K videos come from, for film-making lovers, edit 4K footage with iMovie to do postproduction is a good idea. But for some people who owned a old computer it is painful. Just like the man below:

"Hey Guys,

as I'm going on travels and just having a Macbook Air (2011) with me I'm having trouble editing 4k material. (Actually, even playback 4k material is a pain on that device)

So I'm wondering what's the best option for my limited hardware. Should I still record 4k material (Which I could use once home and back at my powerful desktop) but compress it down to 1080p material for the video's that I'm going to create during travels? If so, what's the easiest and fastest way to compress the material coming from the Mavic Air SD down to 1080p.

What would be your recommendation?"

This guy is looking for one way for editing DJI Mavic Air 4K on iMovie smoothly, he asked for a professional DJI Mavic Air 4K to 1080p converter which can make it easy for editing 4k footage on his old computer. So here I will share an easy-to-use and professional 4k to 1080p video converter which is deaigned for you to compress or convert 4k video by changing video format or adjusting video settings, Pavtube Video Converter for Mac | Windowscomes as winnes from its competitors will ever let you down.

Apart from compressing DJI Mavic Air 4K to 1080p without any video quality loss, it also supports you to choose any video format from it formats list. With it, you are able to 4K MKV, 4K MP4, 4K MOV, 4K AVCHD etc to it and output MP4, MOV, MKV, AVI, M4V etc with 4K/2K/SD/HD resolution. Moreover, many optimized devices presets including iMovie, Final Cut Pro, Xbox, Samsung, Apple, TVs, Wii u, HTC, and more for you to select, so you are free to get the most standard video format for inputting to iMovie for postpruduction. Besides, if you are familiar with the video parameters, you are able to adjust video audio codec, rasolution, bit rate, frame rate, channels, and more.

With this converter, you are able to edit DJI Mavic Air 4K footage before you output, such as you can merge several 4k footage parts into one, trim to cut the part you don't need, crop the black area or the area you want to cut, remove or replace the audio of the source video, add external subtitle to the 4K footage, more thing you can do please refer to this article.

Step by Step to Compress DJI Mavic Air 4K to 1080p for Editing in iMovie

Step 1: Load DJI Mavic Air 4K video into the program.

Start the program on your computer, click "File" menu and select "Add Video/Audio" or "Add from folder" to import DJI Mavic Air 4K video.

load dji mavic air 4k

Step 2. Select iMovie most standard video format

Navigate your cursor to "iMovie and Final Cut Ex..." and select "Apple InterMediate Codec(AIC)(*.mov)" from it submenu. If you have other needs, you can browse the whole list to get the video formats you want.

h264 mov imovie

Step 3. Compress DJI Mavic Air 4k to 1080p for smooth editing

After you have defined the output video fornat, then hit the Settings button, in the next window, you are able to adjust video parameters, including video audio codec, bit rate, resolution, frame rate, channels...

To compress DJI Mavic Air 4k to 1080p, you just need to change video resolution from 3840*2160 to 1920*1080. If you still feel frustrated about video large size, you can lower the video bit rate to get smaller video file size.

imovie setting

Step 4. Start DJI Mavic Air 4k to 1080p conversion

To start DJI Mavic Air 4k to 1080p conversion, just hit the red Convert button on the UI, when the conversion stops, click Open to locate the folder with generated file. Now you are free to input the 4k footage to iMovie for further editing.

Monday, March 12, 2018

How to Play VOB Files on Android Phone/Tablet

VOB (Video Object) is a container format in DVD-Video media that stores videos on a DVD disc. Many Android users want to play VOB files on Android devices such as smartphone and tablet, but are frustrated and disappointed finding the OS is incompatible with VOB format or the video size is too large for their player. So how to play VOB files on Android? If you have that same problem, you can go to the following methods.

Pavtube Video Converter You Should Not Miss

If you want to play VOB files on Android stably, you should convert the video to a compatible format and then transfer the converted video to your Android device. Thus, the video can be played normally and smoothly without any curb. Which converter to choose? Pavtube Video Converter will be a good choice which could satisfy all your needs.

This software allows you to input VOB, AVI, Divx, WMV, WMA, ASF, MKV, MOV, MP4, AVCHD, M2V, M4V etc video formats, and output MP4, MOV, MKV, WMV etc video formats for you. Moreover, with it, you don't even to waste time finding what is the best standard video formats for your target devices, cause hundreds optimized device presets here for you to choose.

If you long for adjusting video parameters, good news, the program grants you to do this change. In the Profile Seetings window, you are able to do some change to your video audio codec, bit rate, frame rate, channels, and more. Meanwhile, the feature-rich tool also works as a professional video editor which grants you to change video effects, trim or crop video, add image/text watermark to video, or add external subtitles to the video. See more details here.

pc mac

Hot Articles: How to Transfer and Play Video_TS on Android Phone/Tablets? | How To: Convert DVD VOB to YouTube FLV file?

3 Step to Convert VOB to Android Compatible Video Formats

Step 1. Add VOB Videos

Run the program and click Add Video button to load VOB files from your computer or devices. Alternatively, you can first locate the VOB movies you want to convert and then directly drag them to the video list pane.

add vob

Step 2. Select Output Video Formats

Click format up-down bar, you will see hundreds video formats and optimized device presets here. Just according to your own needs to select HD MKV, HD MP4, MOV etc. If you have specific target device, no matter what your device are, you can find the best standard video format in the main menu or its submenu.

selest output formats

Tips: Once you define the output video format, then go to Profile Settings by click Settings on the UI, in the pop-up window, you are able to do some change to the video audio codec, bit rate, frame rate, resolution, channels, and more.

Image result for pavtube video converter settings h.264 mp4

Step 3. Start to Convert VOB for Android Phones/Tablets

Up to now, you may have done all things, the left thing is to start the VOB to Android phone/tablet conversion by pressing the red button Convert, wait for a while, go to Open and in the pop-up folder, you can see the generated file. Now you are free to transfer the converted file to your Android phones/tablets without hassle.

Tuesday, February 27, 2018

Upload Phantom 4 Pro+ 4K to YouTube

Upload Phantom 4 Pro+ 4K to YouTube

Have did a 4K video of your DJI Phantom 4 Pro+ flight, after spending long hours uploading to YouTube, the quality was still awful. You know that there are enough 4K videos on YouTube from fellow members and you firmly believe that the uploading job can be done really well with good quality. So what is the secret? The article article will show you the best format and settings to fast upload Phantom 4 Pro+ 4K to YouTube.

Best 4K uploading settings for YouTube

To let your video upload successfully and look beautiful on YouTube, make you to optimize you Phantom 4 Pro+ 4K video with the following settings for format, codec, frame rate, bit rate, resolution, time length and file size limitation.

Container: MP4

Video codec: H.264
Progressive scan not interlacing
High Profile
2 consecutive B frames
Closed GOP. GOP of half the frame rate.
CABAC
Variable bitrate, no bit rate limit required, though we offer recommended bit rates below for reference,
Chroma subsampling: 4:2:0

Audio codec: AAC-LC
Channels: Stereo or Stereo + 5.1
Sample rate 96khz or 48khz

Compatible frame rate and bit rate for 4K video uploading

Resolution

Video Bitrate, Standard Frame Rate
(24, 25, 30)

Video Bitrate, High Frame Rate
(48, 50, 60)

2160p (4k)

35-45 Mbps

53-68 Mbps

Audio bit rate for uploads

Type

Audio Bitrate

Mono

128 kbps

Stereo

384 kbps

5.1

512 kbps

Resolution and aspect ratio

YouTube uses 16:9 aspect ratio players. If you're uploading a non-16:9 file, it will be processed and displayed correctly as well, with pillar boxes (black bars on the left and right) or letter boxes (black bars at the top and bottom) provided by the player.

Time and file size limitations for YouTube video upload

Size: Make sure you're using an up-to-date version of your browser so you can upload files greater than 20GB. The maximum file size you can upload to YouTube is 128GB.
Length: By default, you can upload videos that are up to 15 minutes long, but you can upload longer videos by following the steps below to verify your account.
1. go to the upload page at youtube.com/upload.
2. At the bottom of the page, click Increase your limit. You can also go directly to https://www.youtube.com/verify.
3. Follow the steps to verify your account. You can choose to receive a verification code through a text message on a mobile phone or an automated voice call.
4. Once you've verified your account, you can upload videos that are longer than 15 minutes long

Upload Phantom 4 Pro+ 4K to YouTube with best settings

The DJI Phantom 4 Pro+ shot both 4K H.264 video at 60fps and 4K H.265 video at 30fps with a maximum bit rate of 100 Mbps. Here, if you try to upload Phantom 4 Pro+ 4K H.264 60fps video to YouTube, just lower the output bit rate as YouTube supported bit rate range between 53-68. If you try to upload Phantom 4 Pro+ 4K H.265 30fps video to YouTube, you will not only need to change the video codec to 4K H.264 but also the bit rate between a range from 35-45 Mbps.

Here, you can get YouTube best uploading settings listed above from Phantom 4 Pro+ 4K video with the assistant of Pavtube Video Converter Ultimate (get Mac version). It not only assists you to export Phantom 4 Pro+ 4K H.264/H.265 to YouTube most favorable 4K format, but also flexibly change other profile settings such as video codec, bit rate, frame rate, resolution, audio codec, bit rate, sample rate and channels, etc to make them adapt with YouTube best sharing settings listed above.

Related article: Import Phantom 4 4K to FCP X | Phantom 4 Pro Preview | Downscale Phantom 4 4K to 1080p

Trim/Split Phantom 4 Pro+ 4K video

If the Phantom 4 Pro+ 4K video you try to upload to YouTube exceeds the upload length limitation, you can use the trim function of the program to shorten the video length by cutting off unwanted parts from the beginning or end. If the video file size is too large, feel free to split it into smaller by file size, count or length.

Get Pavtube Video Converter Ultimate with 20% off discount, coupon codec: 45K2D47GJH

Step by step to Upload DJI Phantom 4 Pro+ 4K to YouTube with Best Uploading Settings

Step 1: Load DJI Phantom 4 Pro+ 4K video into the program.

Start the program on your computer, click "File" menu and select "Add Video/Audio" or "Add from folder" to import DJI Phantom 4 Pro+ 4K video.

Load DJI Phantom 4 Pro+ 4K video

Step 2: Output Youtube best uploading format for 4K video.

Click "Format" bar, from its drop-down options, choose YouTube best compatible uploading format from "Common VIdeo" > "H.264 High Profile Video(*.mp4)".

Output Youtube best 4K uploading format

Step 3: Tweak encoding settings for YouTube upload.

Click "Hit "Settings" to open the "Profile Settings" window, here you can adjust the output video codec, resolution, bit rate, frame rate and audio codec, bit rate, sample rate and channels to let them fit them YouTube.

Adjust output profile parameters

Step 4: Trim/Split video file.

If the 4K video is longer than 15 minutes, you can shorten the video length with the trimming function to set the start time and end time to remove unwanted clips from the video.

Trim video length

If the 4K video exceeds the uploading file size limitation, you split the file by file count, time length, or file size in the video splitting window.

Split video file size

Step 5: Start the conversion.

Start DJI Phantom 4 Pro+ 4K video to YouTube best format conversion by hitting the right bottom convert button, when the conversion is over, you will have no limitation to upload and share DJI Phantom 4 Pro+ 4K video on YouTube with fast speed and perfect quality.

Wednesday, February 21, 2018

Edit DJI Mavic Air 4K Video with iMovie

As the most portable DJI drone, the Mavic Air houses a 3-axis gimbal to shoot 8K Sphere panoramas, HDR photos, 4K 30 fps 100 Mbps video, and slow-motion video in 1080p at 120 fps. For Mac users who are looking for a free but professional editing software to handle the DJI Mavic Air 4K video, iMovie can be your best choice. Then how about the workflow of Mavic Air 4K video with iMovie?

Can iMovie native import Mavic Air 4K video

Apple has also updated iMovie 10.1 for Mac with support for 4K editing, in addition, the 4K H.264/MOV video shot with Mavic Air is also included in iMovie supported editing formats. However, it is well known that H.264 is a good delivery file format but no a good editing format. In addition, if your Mac computer doesn't meet the minimum requirements to edit 4K video, you won't get a smooth editing workflow.

Best editing codec for iMovie editing Mavic Air 4K video

For those people who wish to get a high quality and high performance editing workflow of Mavic Air 4K video with iMovie on underpowered computer, it would be much idea for you to transcode and compress Mavic Air 4K to iMovie favorable less processor-intensive editing codec - Apple Intermediate Codec (AIC) with either 1080p or 720p file resolution.

Here, you can download Pavtube Video Converter for Mac to directly generate Apple Intermediate Codec from Mavic Air 4K video. The program supports batch conversion mode, so that you can load multiple Mavic Air 4K video into the application for conversion at one time to save your precious time.

Related article: Import Mavic Pro 4K to FCP X | Edit Mavic Pro 4K with PPC on Mac | Compress Mavic Pro 4K to 1080p

The application not only assists you to encode Apple Intermediate Codec efficiently from Mavic Air 4K video, but also assists you to downscale Mavic Air 4K to 1080p or 720p so that you can get a smooth editing workflow even on slow Mac computer.

Pavtube Video Converter for Mac has perfect compatibility with the new macOS High Sierra, macOS Sierra, Mac Mac OS X El Capitan, Mac OS X Yosemite and Mac OS X Mavericks, etc. It is very simple to use, anyone can learn to use it in minutes. What's more, it produces high quality conversion results with better video/audio quality.

Step by Step to Transcode and Compress Mavic Air 4K to iMovie 1080p AIC

Step 1: Load Mavic Air 4K video.

Download the free trial version of the program. Launch it on your computer. Click "File" menu and select "Add Video/Audio" or click the "Add Video" button on the top tool bar to import Mavic Air 4K video into the program.

Load Mavic Air 4K video

Step 2: Choose output file format.

From "Format" drop-down option, choose iMovie best editing codec by selecting "iMovie and Final Cut Ex..." > "Apple Intermediate Codec (AIC)(*.mov).

Output iMovie best favorable AIC editing codec

Step 3: Compress 4K to 1080p.

Click "Settings" on the main interface to open "Profile Settings" window, from "Size(pix)" drop-down list, choose "1980*1020" or "1080*720" to compress 4K to 1080p.

Step 4: Edit Mavic Air 4K video.

By default the Edit icon is grayed out. To activate the Edit menu, you have to select an item first. When a video or movie is selected, click the pencil like Edit icon on the left top tool bar to open the video editor window, here, you can play and preview the original video and output effects. Also you can flip or rotate video, trim, crop, add watermark, apply special effect, edit audio or insert external subtitle.

Edit Mavic Air 4K video

Step 4: Start the conversion process.

After all the settings is over, go back to the main interface and hit right-bottom "Convert" button to start to convert and compress Mavic Air 4K video to iMovie best compatible Apple Intermediate Codec editing format with 1080p file resolution.

When the conversion is completed, launch iMovie on your Mac computer to import converted video to iMovie for smooth editing workflow on either fast or slow Mac computer.

Wednesday, February 14, 2018

Import Video_TS to FCP X

What is Video_TS folder?

When you insert a video DVD into your computer, you can open the DVD and view the contents just like a folder on your hard drive. Most video DVDs have two folders in the root directory - AUDIO_TS and VIDEO_TS. The VIDEO_TS folder contains all the DVD's video data and playback information. There are three kinds of files inside a Video_TS folder: VIDEO_TS.IFO, VIDEO_TS.BUP, and VIDEO_TS.VOB.

Import Video_TS folder to FCP X?

Obviously, Video_TS folder doesn#8217;t natively work with FCP X, you must convert the Video_TS folder to FCP X supported editing file formats. As a matter of fact, what you need is simply a Mac Video_TS Converter. The program we highly recommend to you here is called Pavtube ByteCopy for Mac, it has perfect compatibility with the all Mac OS including macOS High Sierra, macOS Sierra, Mac OS X El Capitan, Mac OS X Yosemite, Mac OS X Mavericks, etc.

Related article: Import Phantom 4 4K to FCP X | Import NX1 H.265 to FCP X | Can FCP Support DJI Osmo 4K Video

Apart from the Video_TS folder, the program also provides loading support for DVD disc, IFO/ISO image file and also Blu-ray disc/BDMV folder/ISO image file. With this powerful yet simple to use application, you can not only transcode Video_TS to FCP X editable digital file formats such as MP4, MOV (QuickTime), DV, HDV, etc file formats, but also directly output FCP X most favorable high quality and high performance editing codec - Apple Prores in different file types including Apple Prores 422, Apple Prores 422 HQ, Apple Prores 422 Proxy, Apple Prores 422 LT, etc for different editing needs on either powerful or underpowered Mac computer.

Step by Step to Import and Edit Video_TS Folder with FCP X

Step 1: Load Video_TS folder.

Download, install and run this Video_TS Converter on your Mac computer. For loading DVD Video_TS Folder, just click "File" > "Load from folder", you can also load DVD disc by clicking "File" > "Load from disc" or load DVD IFO/ISO image by clicking "File" > "Load IFO/ISO".

Load Video_TS folder

Step 2: Define the output format.

Clicking the Format bar, from its drop-down list, you can choose one of FCP X best compatible editing formats such as "MOV - QuickTime(*.mov)" under "Common Video" main category.

Output FCP X best compatible editing formats

If you wish to achieve a high quality and high performance editing workflow of Video_TS with FCP X, just output FCP X most preferable "Apple Prores 422(*.mov)" under "Final Cut Pro" main category to get the optimal editing experience.

Output FCP X most favorable Apple Prores editing codec

Step 3: Edit Video_TS files with built-in editing options.

By default the Edit icon is grayed out. To activate the Edit menu, you have to select an item first. When a movie title or chapter is selected is selected, click the pencil like Edit icon on the left top tool bar to open the video editor window, here, you can play and preview the original video and output effects. Also you can flip or rotate video, trim, crop, add watermark, apply special effect, edit audio or insert external subtitle.

Edit Video_TS files

Step 4: Begin the final conversion process.

After all setting is completed, hit the "Convert" button at the right bottom of the main interface to begin Video_TS to FCP X supported editing formats or most preferable Apple Prores editing codec transcoding process.

When the conversion is finished, click "Open Output Folder" icon on the main interface to open the folder with generated files. Then just feel feel to import converted video to FCP X for professional post editing workflow.